
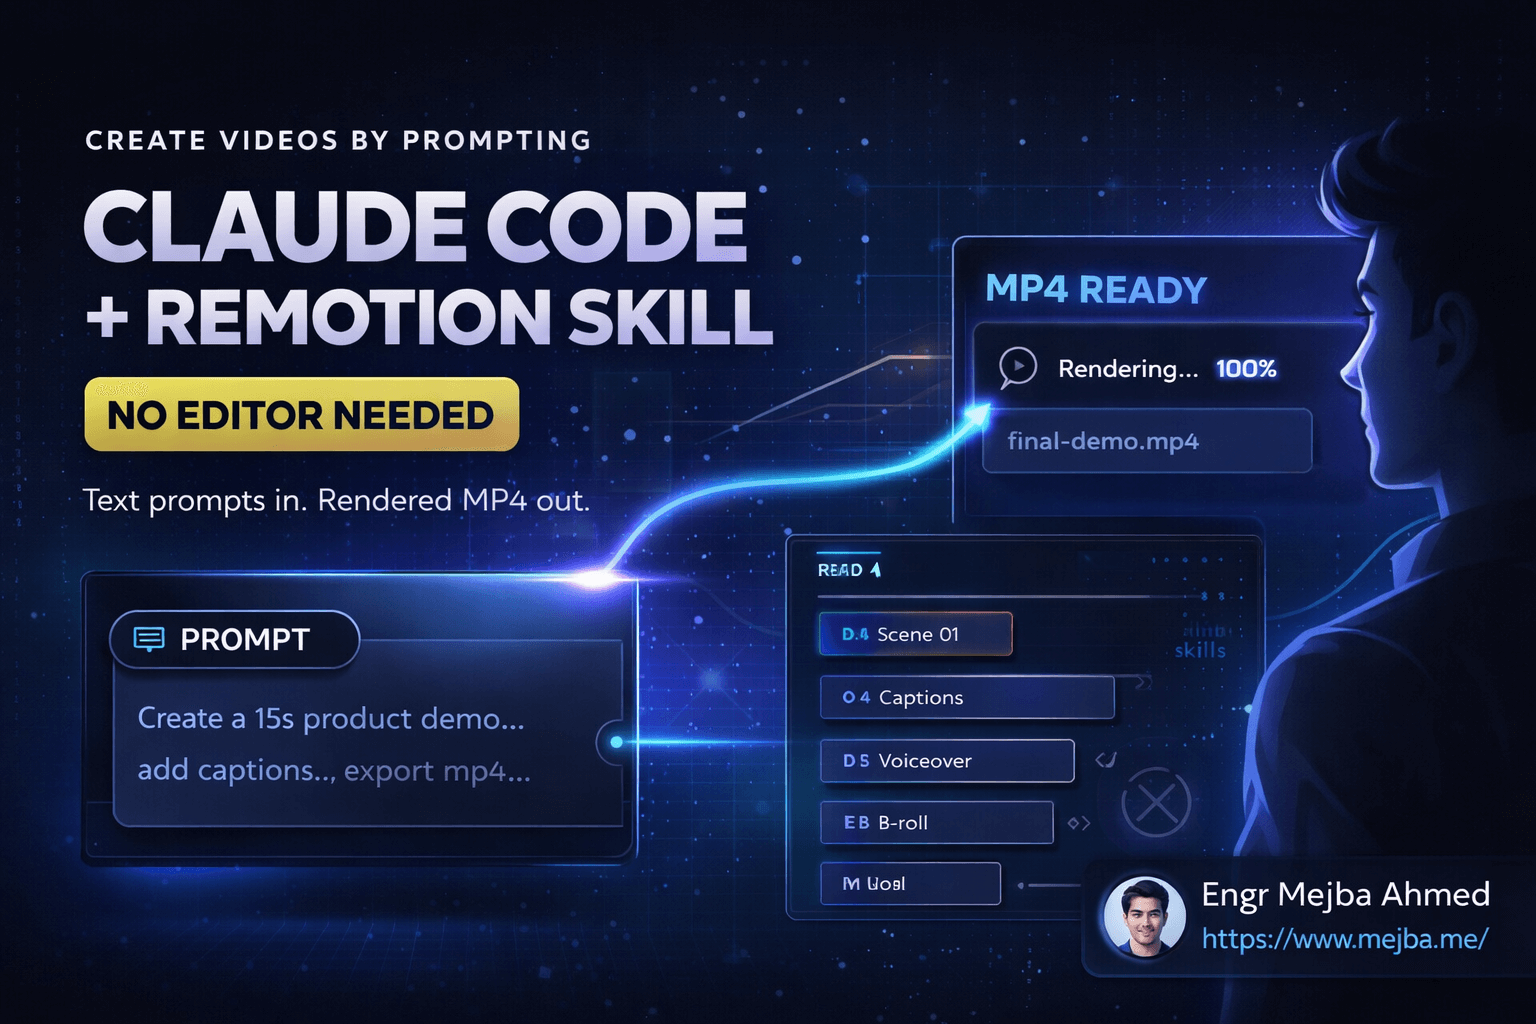
Create Videos by Prompting: Claude Code + Remotion Skill
I just created an entire video without touching a video editor. No timeline. No keyframes. No export settings dialog. Just text prompts to Claude Code, and out came a rendered MP4 file.
This isn't theoretical. I've been testing this workflow for weeks, and the results forced me to rethink what video creation means for developers and content creators. The barrier to entry for video production just dropped from "learn Premiere Pro" to "describe what you want."
The key ingredient? A skill called Remotion that transforms Claude from a text-based assistant into a full-fledged video production studio. If you've been avoiding video content because the tooling felt intimidating, this changes the equation entirely.
Watch the full demonstration here: Claude Code Remotion Video Creation
Why Video Creation Has Been Stuck in 2010
Video editing software hasn't fundamentally changed in over a decade. Yes, the interfaces got prettier. Yes, we got more effects and transitions. But the core workflow remains the same: drag clips to a timeline, adjust properties manually, render, wait, review, repeat.
For developers, this presents a specific frustration. We automate everything else. Our deployments are scripted. Our tests run automatically. Our code reviews happen in pull requests. But video? Still manual labor.
The pain points stack up quickly:
Learning curves that never end. After Effects has menus inside menus inside menus. DaVinci Resolve expects you to understand color science. Even "simple" tools like iMovie require understanding their specific paradigms before you can be productive.
Repetitive work that should be automated. Adding captions to a 10-minute video means manually timing dozens of text elements. Creating a product demo means positioning the same logo in the same corner of every scene. Cut-and-paste operations that computers should handle.
Context switching destroys flow. You're coding, then you need a demo video, so you open a video editor, lose your mental state, fumble through the interface, and by the time you return to coding, you've lost momentum.
What if video creation worked like development? Write code, run a build, get output. That's exactly what Remotion enables, and Claude Code makes it accessible to anyone who can describe what they want.
Remotion: Videos as React Components
Before diving into the Claude integration, understanding Remotion's foundation helps. Remotion is a framework that treats videos as React applications. Every frame is a render. Every animation is a function of time. Every element is a component.
// A simple Remotion scene
import { useCurrentFrame, interpolate } from 'remotion';

export const FadeInTitle = ({ text }) => {
  const frame = useCurrentFrame();
  const opacity = interpolate(frame, [0, 30], [0, 1]);

  return (
    <h1 style={{ opacity, fontSize: 72 }}>
      {text}
    </h1>
  );
};
This declarative approach means videos become predictable, version-controlled, and programmable. Change a variable, and every instance updates. Define a component once, reuse it across hundreds of scenes.
But there's a catch: you need to write React code. For many content creators, that's still a barrier. They understand what they want visually but can't translate it to JSX syntax.
Claude Code bridges this gap. Describe the video, and Claude writes the Remotion code. You get the power of programmatic video creation without needing to know the framework's internals.
Level 1: Basic Setup and Your First AI-Generated Video
Getting started requires minimal setup. You'll need Claude Desktop installed (available for Mac and Windows) and about five minutes of terminal time.
The installation command adds the Remotion skill to Claude's capabilities:
npx skills add remotion dev skills
This single command downloads everything Claude needs to understand video composition, rendering, and export. Think of it like giving Claude a fully equipped kitchen — the skill provides the tools, Claude provides the creativity.
Next, create a workspace folder for your project. Organization matters because video projects generate multiple assets:
mkdir my-video-project
cd my-video-project
Now for the interesting part. Open Claude Desktop (or Claude Code in your terminal) and describe what you want:
"Create a 15-second product demo video for a fitness app. Scrape the colors and copy from this website: [your-url]. Use smooth transitions between features."
Claude analyzes the website, extracts brand colors, pulls relevant text, and generates a complete Remotion composition. The video structure includes:
- Opening hook with the brand name
- Feature highlights with animated text
- Call-to-action ending
First attempt won't be perfect. Timing might feel off. Colors might need adjustment. But you have a working foundation in minutes instead of hours.
One limitation I encountered: some sandboxed environments restrict Remotion's server functionality. If you hit rendering issues, switch to full Claude Code mode rather than the browser interface. The desktop application has fewer restrictions.
Adding Custom Assets and Brand Elements
Raw AI-generated content rarely matches specific brand requirements. The workflow supports customization through asset uploads and targeted prompts.
Drag your logo file into the workspace. Then tell Claude:
"Add this logo to the top-right corner of every scene. Keep it at 80 pixels height with 20 pixels padding from the edges."
Claude modifies the Remotion composition to include the asset with exact positioning. No guessing at pixel values in a timeline. Explicit instructions produce explicit results.
The same applies to fonts, images, and audio:
Upload: brand-font.ttf, background-music.mp3, product-screenshot.png

Prompt: "Use the uploaded font for all text. Add the background music at 30%
volume. Show the product screenshot in the third scene with a zoom-in effect."
Each instruction builds on the previous composition. Claude maintains context between messages, so you're iterating on a single project rather than starting fresh each time.
Rendering the final video happens through Claude's interface or a simple command:
npx remotion render src/index.tsx Video out/final.mp4
What takes professional editors 30 minutes of clicking happens in a single render command.
Level 2: Skill Stacking for Professional Results
Basic video generation is impressive. But combining multiple AI skills creates results that genuinely compete with traditional production workflows.
Skill stacking means connecting Claude to multiple external services:
11 Labs for voiceovers. Instead of recording yourself or hiring voice talent, describe the voiceover style you want. Claude generates the script, sends it to 11 Labs, receives the audio file, and integrates it into the video with proper timing.
Nano Banana Pro for generated visuals. Need a background image that doesn't exist? Describe it, and Claude generates it through integrated image APIs, then places it in your composition.
Wavespeed API for skill management. This gateway connects all external AI services to Claude, managing API keys and routing requests automatically.
The setup involves creating an agent.md file (or claude.md) that persists instructions across sessions:
# Video Production Agent Configuration

## Available Skills
- Remotion: Video composition and rendering
- 11 Labs: Voice generation (API key: configured)
- Nano Banana Pro: Image generation (API key: configured)

## Brand Guidelines
- Primary color: #3B82F6
- Font: Inter
- Logo position: Top-right, 80px height
- Voiceover style: Professional, friendly, medium pace

## Default Export Settings
- Resolution: 1920x1080
- Frame rate: 30fps
- Format: MP4 (H.264)
Once configured, Claude applies these settings automatically. Ask for "a product video with voiceover," and it knows which voice style to use, what colors to apply, and where to place the logo.
The efficiency compounds. Your first video requires detailed instructions. Your tenth video requires just the core concept — Claude handles everything else based on established patterns.
Level 3: Video Chaining for Long-Form Content
Short clips demonstrate the technology. But serious content creation needs longer videos: tutorials, YouTube content, course material. Creating a 15-minute video as a single prompt is impractical. Video chaining solves this.
The approach breaks content into segments:
- Write or generate a script with clear section markers
- Have Claude create each section as a separate video
- Stitch the sections into a cohesive final video
- Add transition effects between sections
A practical script structure looks like:
# Video: Complete Guide to API Security

## Section 1: Introduction (0:00-2:00)
- Hook: Show a breach notification
- Problem statement: APIs are attacked constantly
- Promise: This video covers 5 essential protections

## Section 2: Authentication (2:00-5:00)
- Explain JWT vs session-based
- Show code examples
- Demo: Implementing secure authentication

## Section 3: Rate Limiting (5:00-8:00)
[continues...]
Give Claude this structure and ask it to "create Section 1 as a standalone video." Review, refine, approve. Move to Section 2. The modular approach keeps each generation manageable while building toward a complete product.
For final assembly:
"Combine these section videos in order: section-1.mp4, section-2.mp4, section-3.mp4. Add a 1-second fade transition between each. Normalize audio levels across all sections."
Claude uses FFmpeg under the hood to handle the concatenation and audio processing. The output is a single cohesive video that would have taken hours to assemble manually.
This workflow also supports embedding presenter footage. Record yourself introducing each section, upload the clips, and Claude integrates them with the generated content at specified timestamps.
Real Results: What I've Built So Far
Theory is worthless without practical application. Here's what this workflow has produced for my projects:
Product demo videos. Three different SaaS products needed demo content. Total time from concept to rendered video: under 2 hours each. Traditional workflow would have taken 6-8 hours per video minimum.
Tutorial content. A 12-minute coding tutorial with screen recordings, annotations, and voiceover. The AI generated all motion graphics and title cards. I only provided the screen recordings and outline.
Social media clips. Quick promotional videos for LinkedIn and Twitter. 30-60 second clips that previously seemed not worth the editing effort now take 10 minutes to produce.
Quality assessment: Are these Hollywood productions? No. Are they professional enough for business use? Absolutely. The 80/20 rule applies — 80% of video quality comes from content and concept, which AI can't replace. The remaining 20% comes from production polish, which AI handles adequately.
The real metric isn't quality comparison with professional studios. It's comparing these AI-assisted videos to the alternative: no video at all because the production barrier was too high.
Technical Deep Dive: How the System Works
Understanding the architecture helps troubleshoot issues and push the system's capabilities.
When you prompt Claude for a video, several things happen:
Content analysis. If you reference a website or document, Claude scrapes and parses the content. It extracts text, identifies color schemes, and downloads image assets.
Composition generation. Claude writes Remotion TypeScript/JavaScript code defining every scene, transition, and animation. This code lives in your project directory, fully readable and modifiable.
Asset integration. External assets (uploaded files, generated images, synthesized audio) are organized in a predictable folder structure and referenced in the composition code.
Preview server. Remotion's development server lets you preview the video in your browser before rendering. Each frame renders in real-time as you scrub through the timeline.
Final render. The rendering process compiles all frames into the final video file. This step uses FFmpeg internally for encoding.
The entire pipeline is transparent. You can inspect the generated code, modify it manually if needed, and re-render without losing work.
// Example generated composition structure
export const ProductDemo = () => {
  return (
    <Composition
      id="ProductDemo"
      component={MainVideo}
      durationInFrames={450} // 15 seconds at 30fps
      fps={30}
      width={1920}
      height={1080}
      defaultProps={{
        brandColor: '#3B82F6',
        logoPath: './assets/logo.png',
        scenes: [
          { type: 'intro', duration: 90 },
          { type: 'features', duration: 270 },
          { type: 'cta', duration: 90 }
        ]
      }}
    />
  );
};
This declarative structure means changes propagate predictably. Adjust the brand color in one place, and every scene updates. Extend a scene's duration, and subsequent scenes shift automatically.
Common Issues and Solutions
After extensive testing, these problems appear most frequently:
Sandbox restrictions. Browser-based Claude environments limit file system access. Solution: Use Claude Desktop or Claude Code CLI for full functionality.
Timing mismatches with audio. AI-generated voiceovers don't always match expected durations. Solution: Generate audio first, measure its duration, then build video scenes around those timings.
Memory issues with long videos. Remotion loads frames into memory during preview. Long compositions can exhaust available RAM. Solution: Work on sections separately, combine at the end.
Style inconsistency across scenes. Without explicit instructions, Claude might vary styles between scenes. Solution: Define styles in your agent.md file and reference them consistently.
Rendering failures. Missing dependencies or incorrect paths cause silent failures. Solution: Run npm install in your project directory and verify all asset paths exist.
Most issues trace back to unclear instructions or environmental limitations rather than fundamental problems with the approach.
The Democratization of Video Production
What strikes me most about this workflow isn't the technology itself. It's the accessibility shift.
Video content has been gated by two barriers: creative skill and technical skill. The Remotion skill for Claude eliminates the technical barrier almost entirely. If you can describe what you want, you can create a video.
This matters for several reasons:
Documentation improves. Developers who never created video documentation now can. Projects that relied purely on text readmes can add visual walkthroughs.
Marketing becomes accessible. Small teams and solo developers can produce promotional content without hiring agencies or learning editing software.
Education scales. Course creators can produce more content. Tutorials can include more visual demonstrations. Learning materials get richer.
Iteration speeds up. Testing different video approaches no longer means hours of re-editing. Change the prompt, re-render, compare results.
We're still early in this shift. The tools will improve. The integration will deepen. But the trajectory is clear: video creation is becoming a text-first activity.
What's Next: Autonomous Video Generation
The current workflow still requires human prompting and review. The next evolution — already partially possible — is autonomous video generation.
Imagine connecting Claude to your content calendar. New blog post published? Claude automatically generates a summary video. Product update shipped? A feature announcement video appears without manual intervention.
The technical pieces exist:
- Event triggers from CMS or deployment systems
- Script generation from source content
- Video production through Remotion
- Publishing through platform APIs
What's missing is reliability. Autonomous systems need to produce consistent quality without human review. We're not quite there yet, but the gap is closing monthly.
For now, the semi-automated workflow delivers enormous value. You provide creative direction. AI handles execution. Together, you produce content that neither could create alone.
Getting Started Today
If this workflow interests you, here's the path forward:
- Install Claude Desktop from Anthropic's website
- Add the Remotion skill with
npx skills add remotion dev skills - Create a simple test project to understand the basics
- Experiment with asset uploads and custom branding
- Build complexity gradually — short clips before long videos
The learning curve is measured in hours, not weeks. By this time tomorrow, you could have your first AI-generated video rendered and ready.
Video creation just joined the list of things AI makes accessible to everyone willing to describe what they want. The question isn't whether this changes content creation — it already has. The question is whether you'll adopt it now or wait until everyone else catches up.
Let's Work Together
Looking to build AI systems, automate workflows, or scale your tech infrastructure? I'd love to help.
- Fiverr (custom builds & integrations): fiverr.com/s/EgxYmWD
- Portfolio: mejba.me
- Ramlit Limited (enterprise solutions): ramlit.com
- ColorPark (design & branding): colorpark.io
- xCyberSecurity (security services): xcybersecurity.io